Migrating your blog from Blogger to WordPress is an excellent decision if you’re looking for more control, better customization options, and scalability for your blog. This guide will walk you through the process step-by-step to ensure a smooth transition without losing your content, SEO ranking, or audience engagement.
Table of Contents
- 1 Why Migrate to WordPress?
- 2 Step 1: Choose a Hosting Provider and Install WordPress
- 3 Step 2: Export Your Blogger Content
- 4 Step 3: Import Content to WordPress
- 5 Step 4: Set Up Permalinks for SEO
- 6 Step 5: Redirect Traffic from Blogger to WordPress
- 7 Step 6: Optimize Your New WordPress Blog
- 8 Step 7: Notify Search Engines
- 9 Conclusion
Why Migrate to WordPress?
WordPress is a powerful and flexible platform that offers:
- Enhanced SEO Capabilities: WordPress provides advanced tools to optimize your site for search engines.
- Customization: Thousands of themes and plugins allow you to design your site exactly how you want.
- Content Ownership: Unlike Blogger, WordPress ensures that you fully own your content.
- Scalability: WordPress is ideal for future-proofing your site as your blog grows.
- Community Support: With a massive user base, there are endless resources and forums for troubleshooting and learning.
If you’re ready to make the switch, here’s a detailed step-by-step guide to help you migrate your Blogger blog to WordPress seamlessly.
Step 1: Choose a Hosting Provider and Install WordPress
1.1. Pick a Reliable Hosting Provider
To start, choose a hosting provider that supports WordPress. Some popular options include:
- Bluehost: Officially recommended by WordPress, Bluehost offers affordable plans and excellent support.
- SiteGround: Known for its speed and reliability.
- HostGator: A beginner-friendly option with competitive pricing.
Research each provider to find the one that best suits your needs and budget.
1.2. Install WordPress
Most hosting providers offer a one-click WordPress installation feature. Here’s how:
- Log in to your hosting account.
- Look for the WordPress installer (usually in the control panel).
- Follow the on-screen instructions to install WordPress.
- Log in to your new WordPress dashboard using the credentials provided.
Step 2: Export Your Blogger Content
2.1. Access Blogger Dashboard

- Log in to your Blogger account.
- Navigate to Settings > Backups.
- Click Create a backup and download the .xml file.
This file contains all your Blogger posts, pages, and comments. Keep it safe, as you’ll need it for the next step.
Step 3: Import Content to WordPress
3.1. Install the Blogger Importer Plugin
- Log in to your WordPress dashboard.
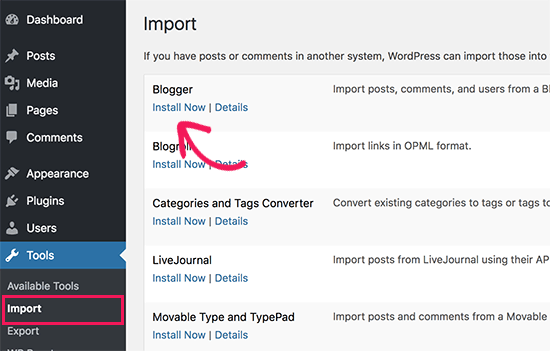
- Go to Tools > Import.
- Find “Blogger” in the list and click Install Now.
- Activate the plugin.
3.2. Upload the Blogger Export File
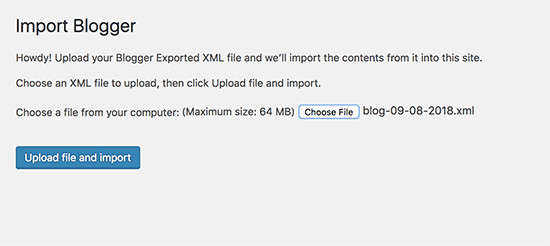
- Click Run Importer under the Blogger Importer plugin.
- Upload the .xml file you downloaded from Blogger.
- Click Upload file and import.
3.3. Assign Authors
You’ll be prompted to assign authors during the import process. You can:

- Assign posts to an existing WordPress user.
- Create a new user specifically for imported content.
Step 4: Set Up Permalinks for SEO
4.1. Match Blogger URL Structure
To retain your SEO rankings, you’ll need to set up permalinks that mimic your Blogger URLs:
- Navigate to Settings > Permalinks.
- Choose Custom Structure and enter:
/%year%/%monthnum%/%postname%.html- Save the changes.
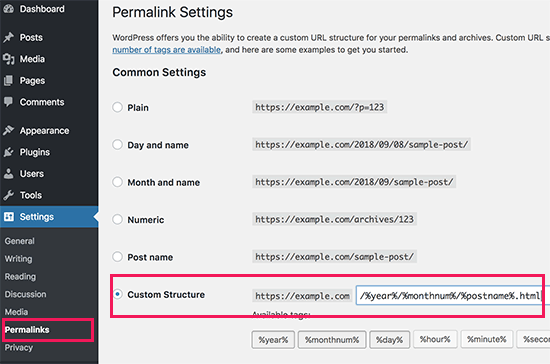
This structure mirrors Blogger’s default URL format, ensuring seamless redirection and preserving backlinks.
However, sometimes your blog post URL, also known as a slug in WordPress, will not match the slugs used by Blogger.
To fix this, you will need to create and run a little code snippet.
For this, we suggest using the WPCode plugin to add the PHP code. This method ensures the safest and most efficient way to include custom code in your WordPress site.
add_action( 'init', 'wpb_update_slug' );

function wpb_update_slug() {
global $wpdb;
$result = $wpdb->get_results("SELECT post_id, meta_value FROM $wpdb->postmeta WHERE meta_key = 'blogger_permalink' ");
$wpdb->print_error();
foreach ($result as $row){
$slug = explode("/",$row->meta_value);
$slug = explode(".",$slug[3]);
$wpdb->query("UPDATE $wpdb->posts SET post_name ='$slug[0]' WHERE ID = '$row->post_id' ");
}
echo "DONE";

}
After saving the code, visit any page on your WordPress site in order to trigger this script.
Important: After the script has run, don’t forget to disable or delete it from your WPCode library because it only needs to run once.
Step 5: Redirect Traffic from Blogger to WordPress
5.1. Install the Blogger to WordPress Redirection Plugin
- In your WordPress dashboard, go to Plugins > Add New.
- Search for “Blogger to WordPress Redirection” and install it.
- Activate the plugin.
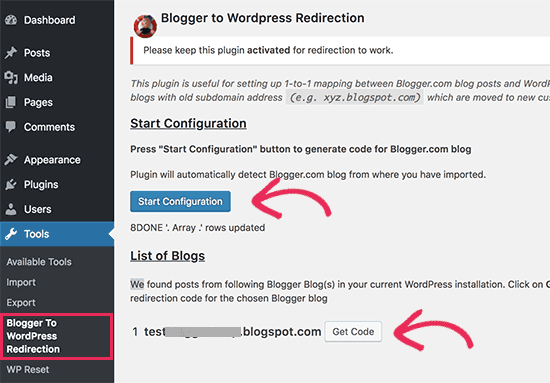
5.2. Generate the Redirection Code
- Go to Tools > Blogger to WordPress Redirection.
- Click Start Configuration.
- The plugin will generate a redirection code for your Blogger site.
5.3. Add the Code to Blogger

- Log in to your Blogger dashboard.
- Go to Theme > Edit HTML.
- Replace the existing code with the generated redirection code.
- Save the changes.
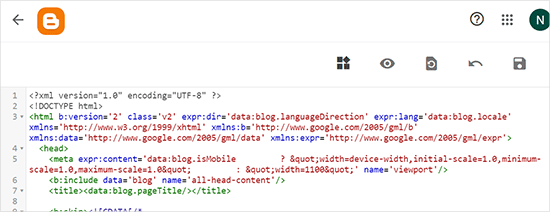
This ensures that visitors to your old Blogger site are seamlessly redirected to your new WordPress blog.
Next, we need to set up redirects for mobile users.
You need to go back to the Themes page in your Blogger blog’s dashboard. Click on the gear button below the mobile preview of your blog.
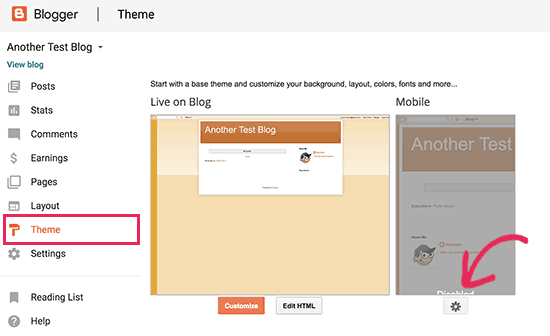
A popup will appear where you need to select the ‘No. Show desktop theme on mobile devices’ option.
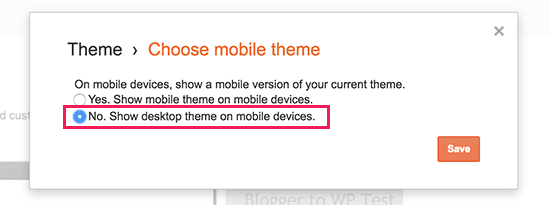
Then, click on the ‘Save’ button.
Step 6: Optimize Your New WordPress Blog
6.1. Install Essential Plugins
To enhance your blog’s functionality, consider installing these plugins:
- Yoast SEO: Optimize your posts and pages for search engines.
- Akismet: Protect your site from spam comments.
- WP Super Cache: Improve site speed with efficient caching.
- Jetpack: Enhance security and performance while adding useful features like social sharing.
6.2. Choose a WordPress Theme
Pick a responsive and SEO-friendly theme for a professional look. Popular options include:
- Astra: Lightweight and customizable.
- GeneratePress: Known for its speed and simplicity.
- OceanWP: Offers extensive customization options.
6.3. Test Your Site
Ensure everything is functioning correctly:
- Check content formatting.
- Test links, images, and embedded media.
- Verify mobile and desktop responsiveness.
Step 7: Notify Search Engines
7.1. Submit Your Sitemap
- Install and activate the Yoast SEO plugin.
- Go to SEO > General > Features and enable XML sitemaps.
- Copy your sitemap URL (e.g.,
https://yourdomain.com/sitemap_index.xml). - Submit the sitemap to Google Search Console and Bing Webmaster Tools.
7.2. Update Your Robots.txt
Ensure search engines can crawl your new WordPress site. Edit the robots.txt file to include:
User-agent: *
Disallow:
Sitemap: https://yourdomain.com/sitemap_index.xml
Conclusion
Migrating from Blogger to WordPress is a significant step toward growing your blog and unlocking its full potential. By following this comprehensive guide, you can ensure a smooth transition, retain your SEO rankings, and provide a better experience for your audience.
If you encounter any challenges, feel free to seek help from the WordPress community or leave a comment below. Happy blogging!
